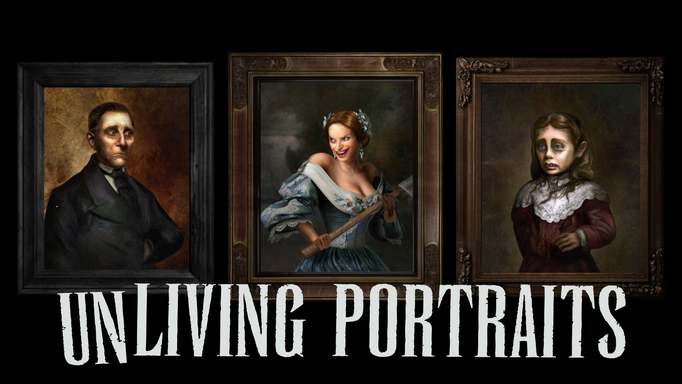
How many times have you seen the “living portraits” at Disneyland’s Haunted Mansion, and wanted something like it for your home? Well today’s the day. With a little DIY inspiration, a few tools, and AtmosFX’s UnLiving Portraits Decoration Collection, your home will have a Halloween prop everyone is talking about.


What you’ll need…

- Monitor
- Foam or particle board crown moulding
- Saw
- Something to measure a 45 degree angle
- Double sided tape
- Tape measure
- Spray paint
- Staple gun (not required)
- Speakers (if your monitor does not have built-in speakers)
Additionally, this project will use the Sprite Motion Sensor Media Player and UnLiving Portraits Decoration Collection.
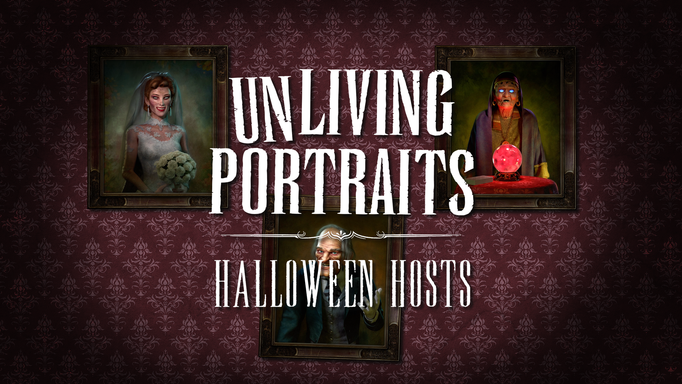
Note: AtmosFX has created additional decoration that works exactly like UnLiving Portraits. Titled UnLiving Portraits: Halloween Hosts, this additional collection of scenes allows you to add even more “spirited” portraits to your Halloween display!
Step 1: Measure your monitor

Be sure to measure the length on the inside of the bezel, or else the frame you’ll be making will be too big. My monitor measured 13.5” by 24.5”.
Step 2: Measure your moulding

Because I knew the general dimensions of my monitor, I precut the moulding boards at the store. This ensured I didn’t pay extra for more length than I needed. I was very liberal with my estimate so I wouldn’t have to do any extra math to figure out OD to ID (outer dimensions to inner dimensions). Simply put, I marked the middle of the board, divided each length by 2 (so for the 13.5” sides I would count out 6.75” from center) and market the ends.
Next, I used a square to mark a line along a 45-degree angle. This will be my cut line.
Instead of measuring out everything again, I just married up two boards and copied the ID marks.
Step 3: Saw

Step 4: Spray paint
Instead of gold spray paint, I personally like to use brass, which has a richer tone and immediately looks more aged. Remember to work in a properly ventilated area and wait for the paint to completely dry before moving onto the next step.

Step 5: Staple the sides together (extra step)
This step isn’t required, but it does make things a little easier when applying the frame to the monitor. If you don’t own a staple gun, you can also just tape or hot glue the corners together.

Step 6: Apply tape to the monitor

Take your double-sided tape and start applying it to the bezel of your monitor. Note, when it’s time to take off the frame and put away the decorations, you can clean off any tape residue with rubbing alcohol.
You can see that I’ve applied eight pieces of tape, which allows for two connection points for each board.
Step 7: Attach the frame

This step should be fairly simple. Press the edges of the boards against the double sided tape. If you measured correctly the monitor bezel should be completely covered.
Step 8: Hide the media player (Extra)
If you have any extra double-sided tape, I like to hide the media player behind the monitor since it is so small.

Step 9: Place the motion sensor

Hide the motion sensor where it isn’t immediately noticeable. The sensor needs to be line-of-sight with your unsuspecting victim, so make sure the sensor isn’t covered. I hid mine right under the picture frame.
It isn’t too noticeable, but will still catch anyone who walks in front!
My picture frame placed on a table with black fabric to further hide everything.
Step 10: Set up your digital decorations!

From the menu screen, click OK on "Digital Decorations," then find the file you want to play.
When you find the file, hit OK to choose the file (the file info and preview will show on the right), then hit "Play" to make the video go full-screen.
Be sure your sensor button is turned on (press the sensor button on the remote to double check) and that your media player is set to repeat 1.
Step 11: Find an unsuspecting victim!

There you go! This project took me a total of about two hours to complete and even though UnLiving Portraits works great, I encourage you to try this with any of AtmosFX’s startle scare effects!
Have you created your own freaky portrait gallery? If so, we want to see it! Send your photos and videos to us using this simple online submission from!